 旅遊英文會話導覽:用英文介紹淡水北投與台灣傳統節慶
 新手入門的保險通識課
前端工程師必學知識!建立第一個Angular專案

文、意如老師
建立第一個Angular專案,了解基本架構後就要來實際建立一個Angular專案了。
▶ 延伸閱讀:前端網頁工程師入門必備!認識Angular
任務一:建立專案
1-1. 建立開發所需要的檔案
1-2. 建立dist資料夾來放置編譯後的網頁
任務二:程式流程運作
任務三:Component元件的屬性-資料顯示
3-1. 建立、插入值
3-2. 建立、插入陣列值
3-3. 建立、插入物件值
任務一:建立專案
1-1. 建立開發所需要的檔案
可以透過指令 ▶ ng generate component <name> 來快速建立開發所需要的檔案。
例如要建立mydatapage的一個元件(Component)。
指令為 ▶ ng generate component mydatapage

此時會在src/app中新增(CREATE)四個檔案,及更新(UPDATE) app.module.ts
mydatapage.component.css ▶ CSS樣式
mydatapage.component.html ▶ 基本模板Template
mydatapage.component.spec.ts ▶ 執行ng test命令會透過Karma進行測試
mydatapage.component.ts ▶ 元件Component

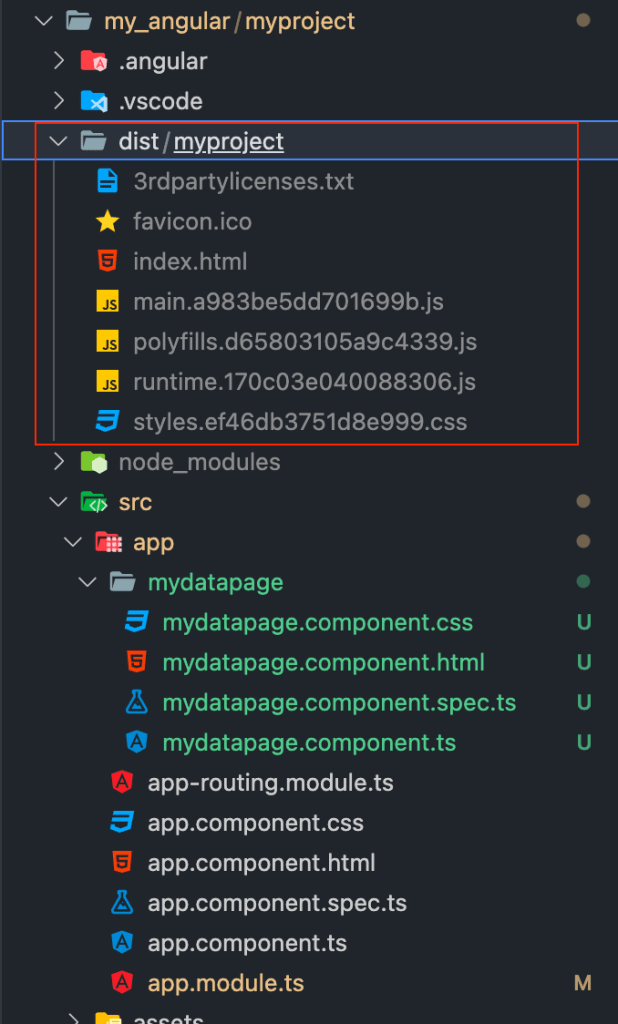
1-2.建立dist資料夾來放置編譯後的網頁
使用ng build會在專案夾目錄下建立dist資料夾,專門放置已編譯後的網頁。
如要將此專案佈署至正式環境時,指令則是使用 ng build -prod 。

建立好之後,目錄上會多出dist資料夾,參考如下圖:
任務二:程式運作流程
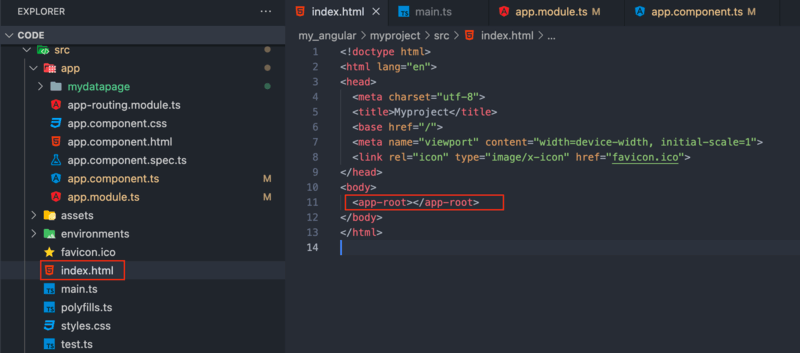
Angular 是一個SAP(Single Page Application)的網頁架構,整個網站只有唯一的一張頁面index.html,所有的頁面切換、使用者介面等內容改變都是靠著JavaScript來做即時動態切換。
在index.html內會包含main.ts (JavaScript的執行檔)
起始頁請參考設定檔angular.json。

▶ 運作流程:1.index.html
在先前 ng build 所產生的index.html可以看到網頁載入了main.xxxxxxx.js

▶ 運作流程:1.index.html ▶ 2.main.ts
開啟main.ts ▶ 預設起始載入模組為app.module.ts(src/app/app.module)
bootstrapModule則使用app.module中的AppModule類別

▶ 運作流程:1.index.html ▶ 2.main.ts ▶ 3.app.module.ts
Angular主要透過元件(Component)來處理所有的介面,而元件必須在模組中設定。
先開啟src/app/app.module.ts
在 @NgModule 模組內中預設 bootstrap 屬性為 AppComponent 為起始元件。
因此引入app.component.ts(src/app/app.component.ts)

▶ 運作流程:1.index.html ▶ 2.main.ts ▶ 3.app.module.ts ▶ app.component.ts
1. 開啟src/app/app.component.ts
2. 因有宣告為 @Component ,因此AppComponent類別將視為angular中的一個元件(Component)
3. 元件中的selector 為css的選擇器,會將網頁包含app-root標籤替換成./app.component.html
4. 元件中的templateUrl 會將此樣板輸出至介面上
5. 元件中的styleUrls樣板會套用此樣式[可以同時指定多個樣式]

了解了整個流程後,先開啟src/index.html 檔,可以看到有一個 <app-root></app-root>標籤,只要當Angular 在運作時就會被替換成app.component.html
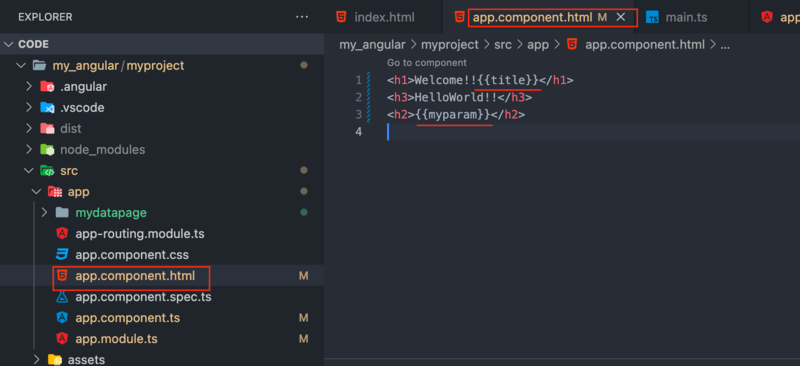
接著開啟src/app/app.component.html
將原本的首頁內容全部刪掉,換成自己的內容
<h1>Welcome!!{{title}}</h1>
<h3>HelloWorld</h3>

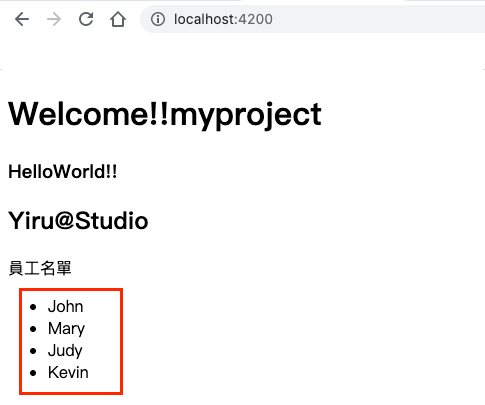
最後透過指令ng serve --open來啟動專案。

此時會自動開啟瀏覽器,預設網址為:http://localhost:4200/

任務三:Component元件的屬性-資料顯示
3-1. 建立、插入值
路徑:src/app/app.component.ts
在AppComponet 元件中建立屬性變數為myparam = 'Yiru@Studio';

路徑:src/app/app.component.html
使用兩個大括弧{{}} 來插入值,例如{{title}}、{{myparam}}
結果顯示:

3-2. 建立、插入陣列值
路徑:src/app/app.component.ts
在AppComponet 元件中建立屬性陣列為:
member_name = ['John','Mary','Judy','Kevin'];

路徑:src/app/app.component.html
使用*ngFor來讀取陣列並印出,
例:*ngFor = "let mbn of member_name"
mbn為自己宣告的變數名稱(key),of 後的member_name為要讀去的陣列屬性。
{{mbn}}會去讀取member_name陣列並印出。

結果如下:
3-3. 建立、插入物件值
路徑:src/app/app.component.ts
在AppComponet 元件中建立屬性物件資料為:
weather = [
{day:'Monday',degrees:'16'},
{day:'Tuesday',degrees:'23'},
{day:'Wednesday',degrees:'19'},
{day:'Thursday',degrees:'25'},
{day:'Friday',degrees:'22'},
{day:'Saturday',degrees:'27'},
{day:'Sunday',degrees:'23'},
]

路徑:src/app/app.component.html
使用*ngFor來讀取物件並在表格中印出,
例:*ngFor = "let wr of weather"
wr為自己宣告的變數名稱(key),of 後的weather為要讀去的物件屬性。
{{wr.屬性}}會去讀取weather物件中的陣列資料並印出。

結果如下:

本文首圖圖片來源:Pexels
加入菜鳥救星官方Line並回覆「我想看文章」,不定期獲得更多知識吧!
不同頻道,不同知識!
Facebook Instagram Youtube